


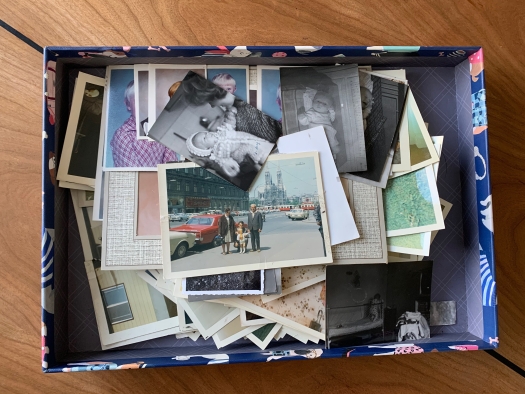
A big box full of photographs sits in my basement. The pictures rarely get looked at in their muddled state. There are duplicates, near-same shots, and blurry pics where one can hardly tell what the subject is. Yet many others are treasures. Looking at them should be a fun and shareable experience but ends up being a chore in this state of disarray. Photos are feasted on when pared down to the best ones and organized by timelines. Looking through an album of carefully selected photos is absorbing a great story.
I love to see people’s photos but, less so when looking at them digitally. It’s lonely as only one person looks at a time. To top that off, there are usually too many digital pictures to get through. We take so many since it’s free and easy and these are rarely whittled down to the best shots. A thoughtfully compiled, real photo album, on the other hand, is easy to look at collectively, making for a connected experience.
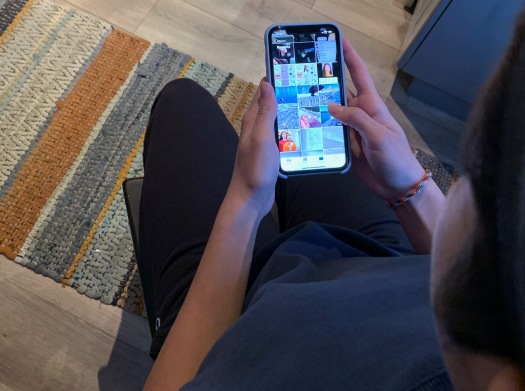
It’s easy to get bored flipping through pics on someone’s phone, or worse, waiting while they look for one before the story continues. It would be good to organize those digital photos in a way that makes them easy to find and look through but for me it feels right to deal with the printed ones first. They are, after all, taking up physical space.
It’s worthwhile getting started on albumizing photos, or why even hold on to them? By breaking it down into small steps, the project is easier to get through. It’s rewarding each time a step is completed.

I started by taking our family photos from my Mom and Dad’s house so I could combine them with mine, organizing the whole shwack. This made a big project even bigger but I want to do it right, and only once.
STEP ONE:
Collect photos from everywhere in the house making one huge pile of photos and albums. Make sure you have gathered them all. I went as far as to remove from frames and albums so I can find all duplicates. It’s extra work but, like I said, I am counting on only having to do this once.
We had some sticky paged albums which I wanted to remove photos from. I quickly decided never to use this type of album again. The old photos were not going to budge without tearing. If you run into this problem you can see how to remove the glued pictures from these pages in this video:
Do not use a heat gun- it’s too hot. I used my blow dryer, being careful not to overheat and start a fire! Keep the heat continuously moving.
What I learned: Updating frames brought great joy and this opened my mind to the idea that choosing photo’s to frame doesn’t have to be tough. They can and should be changed from time to time.
STEP TWO:
Gather a few boxes/containers in which to group photos. I started with four boxes (I used can flats) and sorted the box of jumbled photos into the following timelines, using my life as the reference point:
a. From before I was born to Kindergarten;
b. from grade 1 to when I was 18;
c. from adulthood to before my child was born; and
d. after my child was born.

What I learned: Label the boxes with which timeline they are for. Initially, I didn’t and got mixed up. Spare yourself the pain.
STEP THREE:
These were some big piles so had to be split further. I drew this diagram just to show an example of how I split one of these categories further:

This helped identify pictures that were taken the same day and duplicates, making it easy to choose the best ones for the albums. All the others were put into a pile to deal with later as duplicates/similars.
As you do this discard photos of extremely poor quality, or that are not meaningful as you come across them, making your piles smaller and easier to deal with. This part should continue throughout the whole process as you will be going through each pile more than once. Don’t worry if you miss some doubles or can’t decide. Keep and decide later.

While splitting up piles I reached out to my parents, cousins, friends, and my brother for information about the pictures. I was pleasantly surprised to learn we had pics of my parents very first car, and my first time flying overseas as a baby. As I gathered info about some photos I wrote on the back, preserving the details. It may not be possible to do this for all the photos but do it for some! Remember that these may be passed down to someone who would love to know their family history.

What I learned: This is a great opportunity to reach out to people. Call or text and ask for details then send your duplicates as a thank you. All will love the opportunity to connect, receive a piece of mail, and who doesn’t love a walk down memory lane!
STEP FOUR:
As you work keep these questions in mind:
-
- Does looking at this picture make me feel anything?
Yes = keep, No = toss - Does this picture represent an important time for someone in my family?
Yes = keep, No = toss - Is one picture enough to represent this time?
Yes = put the rest with duplicates, No = choose one to three of the best ones. This will keep the story concise and engaging with less clutter.
- Does looking at this picture make me feel anything?
What I learned: I had a big box of duplicates/similars at the end of all this and cannot throw them all out. I made a mini album for my brother with some, sent others to family, let my daughter choose some for her own album, tossed some, and kept my very favourite ones in a clearly marked envelope.
STEP FIVE:
Once you have gone through all the photos which are now whittled down into manageable piles, choose one pile and set the pictures out in a somewhat chronological order. Just do your best, it doesn’t have to be perfect. These will be the piles that make up an album and this is putting them down in the general order in which they will live in the albums.
I made piles of approximate 5 year periods. I want to represent times in our lives, really, not an exact year by year.

What I learned: Try filling an album once you have that first 5 year pile split into 3 or so. It’s rewarding and fun and will help motivate you to keep going, eventually finishing the whole project. This way you can apply things you learn as you progress. Getting family members to help fill the albums is fun too!
Albums:
There are many kinds of albums to choose from like sticky pages and sleeves, but my favorite are paper pages combined with sticky corners holding photos in place. These allow the freedom to play with layout especially when displaying a variety of photo sizes on a single page. You can’t beat the classic feel.
Once you have filled an album, make a note on the spine or cover stating the time frame or event.

The whole point of taking photos is to share them and reminisce. Honor the people who took the time to record these moments in photos. Create a good home for the people and memories that are your roots with photo albums, making the experience of looking through them the best it can be!
Regarding digital photos: We take so many photos now that the magic can get lost. Anytime you are waiting around, skip the social media and spend a few moments de-cluttering your photos. Keep only the best ones and create folders that are separated by event or year. Later, when you want to show a photo on your phone you can find it quickly, respecting everyone’s time. If you decide to print some, it will be easy to find and choose which ones.
I hope this can inspire you to sort your photos and that you enjoy getting in touch with your family history, like I did!

This was great, my mom handles most of this stuff. I tried to make baby albums for the girls but failed. So now I have gone back and just wrote miscellaneous stuff in for the details. It has gotten out of hand as I have just started making shit up.
LikeLiked by 1 person
Thanks for this, Irena. As Elliott said, I handle this stuff, so many of your suggestions will come in handy when I resume my quest to complete my albums.
I love that picture of your Mom and you as a baby.
LikeLiked by 1 person
Thanks Donna, I hope it can be helpful! That picture is my mom and Gogo, as baby!
LikeLike
As always, beautiful story.
Get Outlook for Android ________________________________
LikeLike
This looks like it was quite a task Irena!
LikeLike